In Shopify, you can set up custom shipping prices for your customers to see when they checkout. You can also calculate shipping rates. However, before setting up shipping prices, you need to have an understanding of shipping zones and profiles. Shipping zones in Shopify are the places or countries where you can choose to ship your products. You select shipping prices for shipping zones. On the other hand, through shipping profiles, you can define the cost of shipping for particular products or areas.
If you need more specialized help, partner with Website Pandas, a growth-oriented Shopify agency. From setting up shipping rates to optimizing every part of your store, we ensure that it keeps operating seamlessly.
Keep reading to learn how to set up and manage a shipping profile and create shipping rates for the regions where you ship your products.
How to Setup Locations on Shopify Store?
The shipping location is the place from where your orders are shipped. This is the address you specify when setting up your Shopify store. So, check whether you’ve entered the correct address. The number of locations you can ship to depends on your Shopify plan. Here’s how many locations you can ship to depending on your plan.
- Shopify Lite:- 3 locations
- Basic Shopify:- 4 locations
- Shopify:- 5 locations
- Advanced Shopify:- 8 locations
- Shopify Plus:- 20 locations
How to Add Locations on the Shopify Store?
Add a location on a desktop, iPhone, or Android with the steps below.
1. Desktop
- Access your Shopify admin and navigate to Settings.
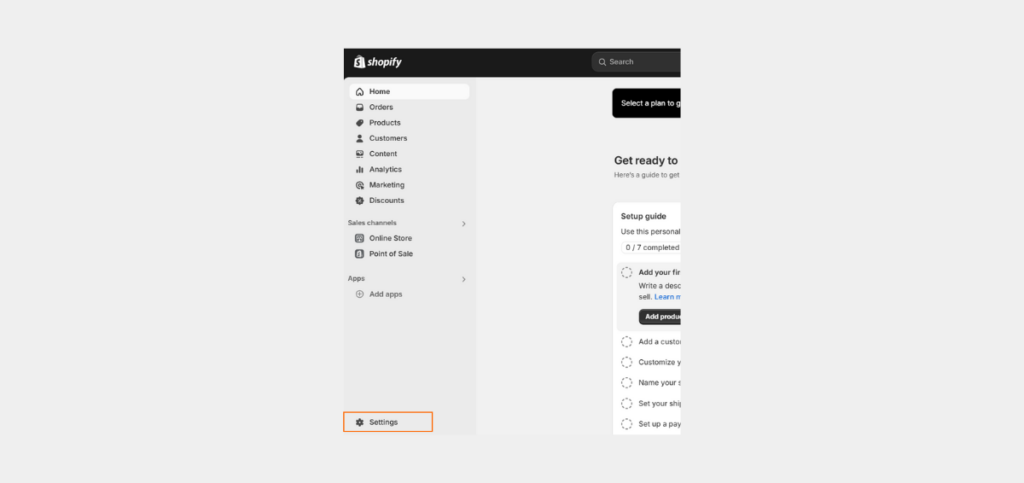
- Here, choose ‘Locations.’
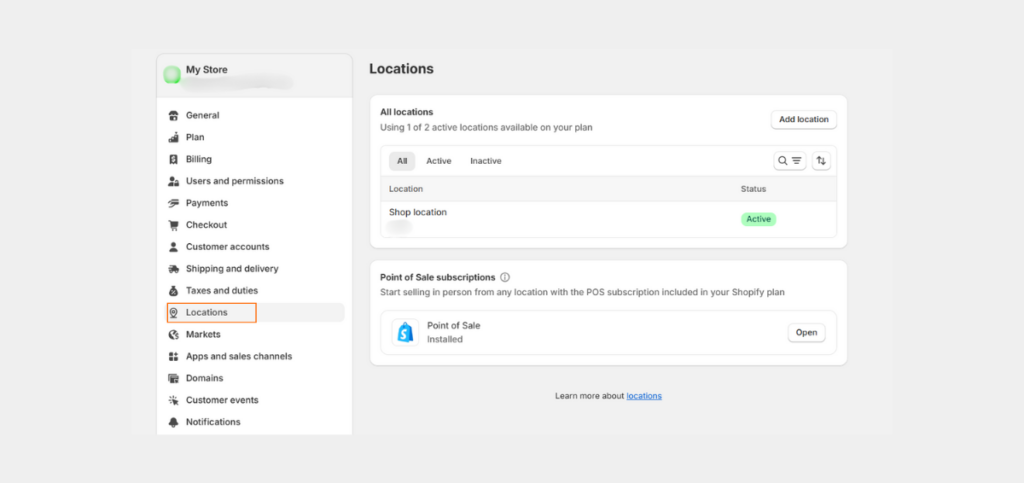
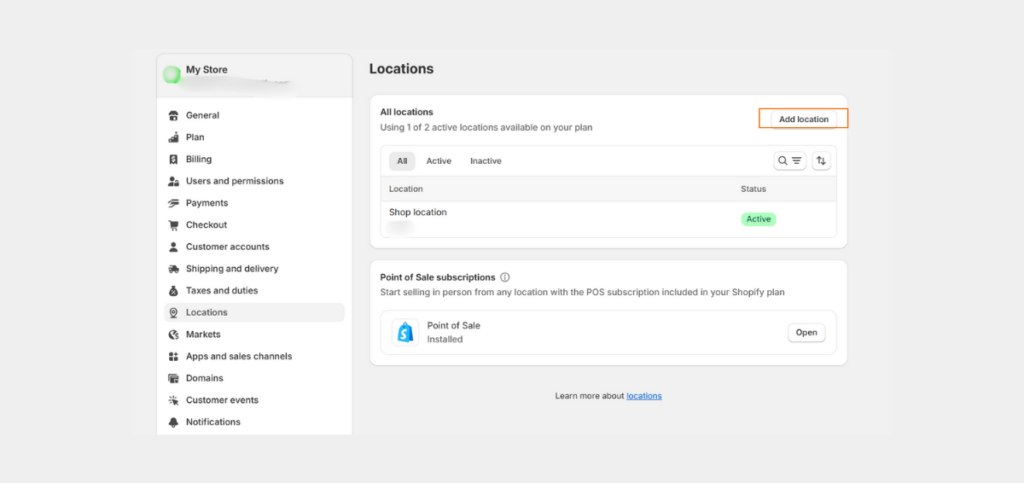
- Tap ‘Add Location’ in the ‘All Locations’ section.
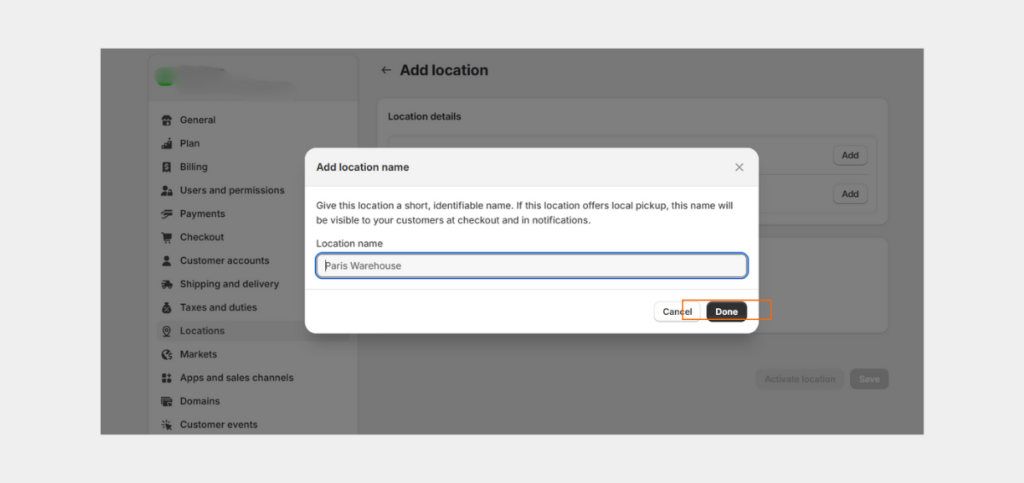
- Input the name of the location in the ‘Location Details’ section. To do so, tap ‘Add’ in the ‘Name’ section. Input the location name and tap ‘Done.’
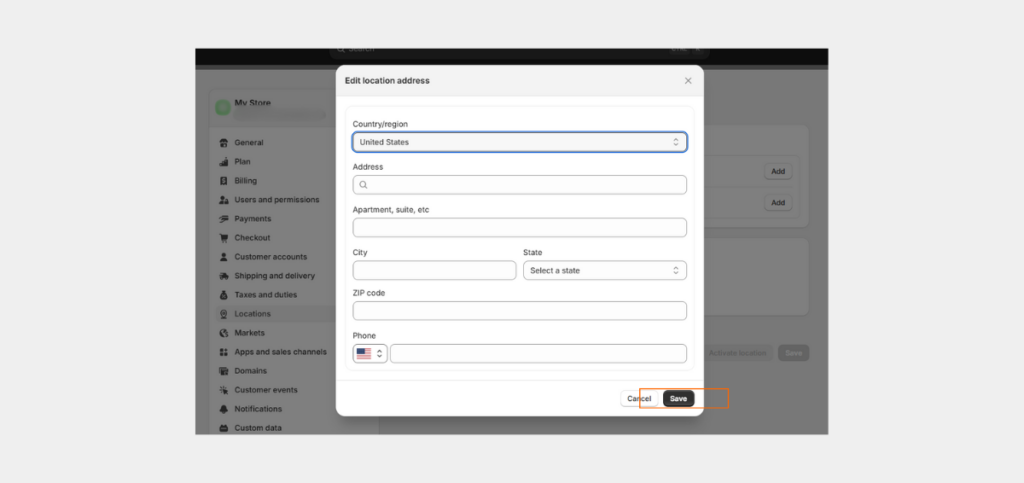
- Type the address of your location in the ‘Location Details’ section. To do so, tap ‘Add’ in the ‘Address’ section. Input the address and hit ‘Save.’
- You can also make your products available to be purchased online. For this, go to the ‘Fulfillment Details’ section and choose ‘Fulfill Online Orders from this Location.’
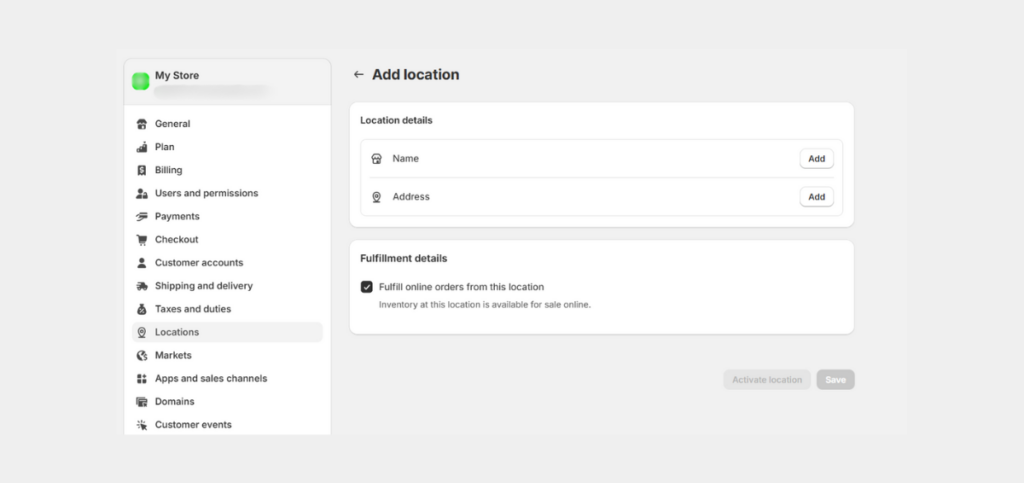
- Now, tap ‘Save.’
2. iPhone
- Tap the three horizontal dots in the Shopify app.
- Now, choose ‘Settings.’
- Touch ‘Locations’ in the ‘Store Settings’ section.
- Touch ‘Add Location’ in the ‘All Locations’ section.
- Add your location in the ‘Location Details.’ For this, tap ‘Add’ in the ‘Name’ section. Input the name of the location and tap ‘Save.’
- Type the address of the location in the ‘Location Details’ section. Tap ‘Add’ in the ‘Address’ section. Input the address and tap ‘Save.’
- You can also make your products available to be bought online. For this, go to the ‘Fulfillment Details’ section and tap ‘Fulfill Online Orders from this Location.’
- Now, touch ‘Save.’
3. Android
- Open the Shopify app and touch the three vertical lines.
- Now, go to ‘Settings.’
- Touch ‘Locations’ in the ‘Store Settings’ section.
- Touch ‘Add Location’ in the ‘All Locations’ section.
- Add your location in the ‘Location Details.’ For this, tap ‘Add’ in the ‘Name’ section. After entering the name of the location, hit the checkmark button.
- Type the address of the location in the ‘Location Details’ section. Tap ‘Add’ in the ‘Address’ section. Input the address and tap ‘Save.’
- You can also make your items available to be purchased online. For this, go to the ‘Fulfillment Details’ tab and tap ‘Fulfill Online Orders from this Location.’
- Now, touch ‘Save.’
Still not sure, what to do? Let our experts simplify your journey. Contact us today for Shopify support!
How to Deactivate Locations on the Shopify Store?
If you don’t wish to ship your products to a region, you must deactivate those locations. Here’s how to do it.
1. Desktop
- As the Shopify admin, navigate to ‘Settings.’

- Now, choose ‘Locations.’

- Tap the location you wish to deactivate in the ‘Add Locations’ section.

- Tap ‘Deactivate Location.’
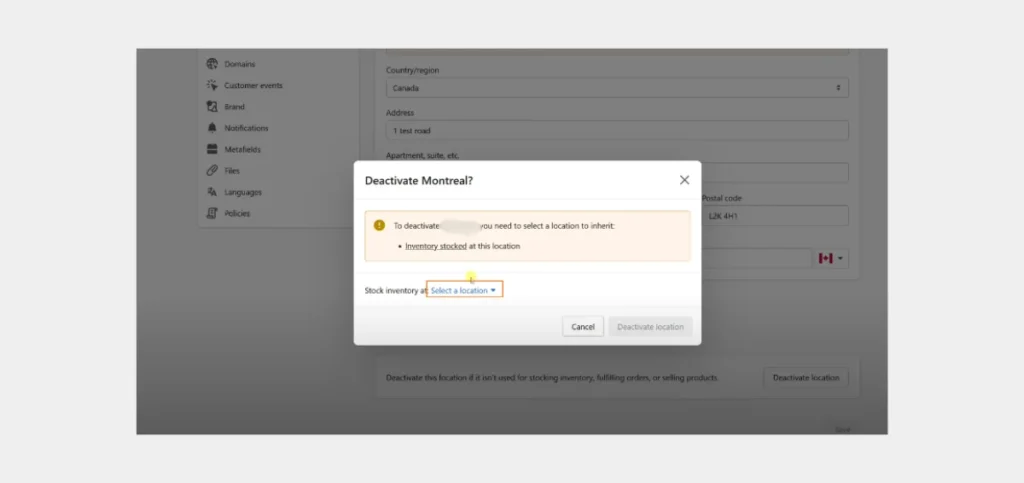
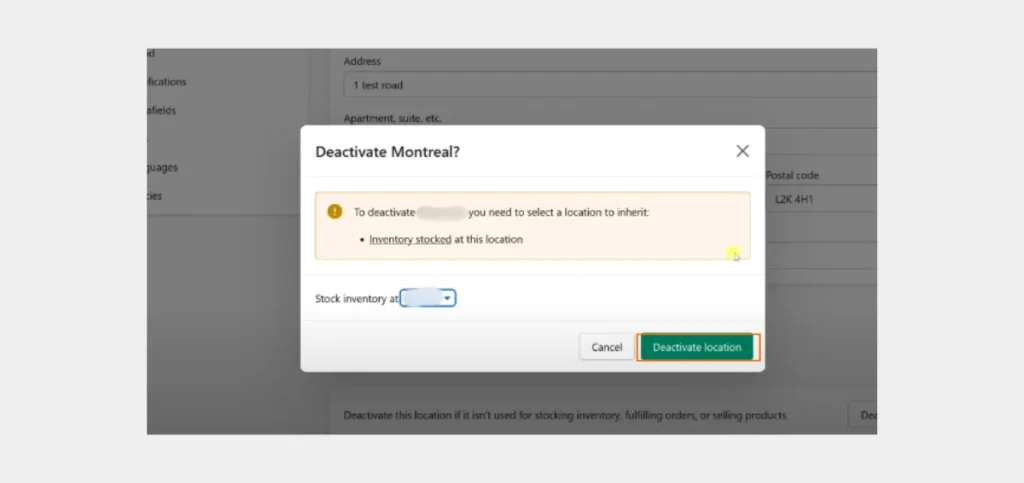
- Tap ‘Deactivate Location’ to confirm your action.
2. iPhone
- Open the Shopify app and hit the three horizontal dots button.
- Choose ‘Settings.’
- Tap ‘Locations’ in the ‘Store Settings.’
- Tap the location to deactivate in the ‘All Locations’ section.
- Touch ‘Deactivate Location.’
- Confirm your action by tapping ‘Deactivate Location.’
3. Android
- Open the Shopify app and hit the three vertical lines button.
- Choose ‘Settings.’
- Tap ‘Locations’ in the ‘Store Settings.’
- Tap the location to deactivate in the ‘All Locations’ section.
- Touch ‘Deactivate Location.’
- Confirm this action by tapping ‘Deactivate Location.’
How to Reactivate Locations on the Shopify Store?
If you have deactivated a location but now want to activate it again, use the steps below.
1. Desktop
- In the Shopify admin, navigate to ‘Settings.’ And choose ‘Locations.’

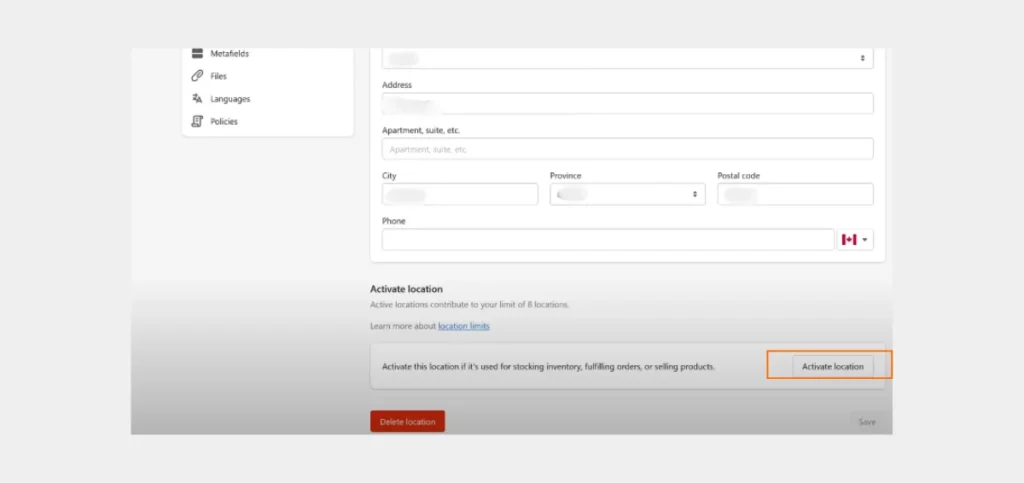
- Tap the location you wish to reactivate in the ‘Add Locations’ section.

- Tap ‘Activate Location.’
2. iPhone
- Open the Shopify app and hit the three horizontal dots button.
- Choose ‘Settings.’
- Tap ‘Locations’ in the ‘Store Settings.’
- Tap the location you wish to reactivate in the ‘All Locations’ section.
- Tap ‘Activate Location.’
3. Android
- Open the Shopify app and touch the three vertical lines button.
- Choose ‘Settings.’
- Tap ‘Locations’ in the ‘Store Settings.’
- Tap the location you wish to reactivate in the ‘All Locations’ section.
- Tap ‘Activate Location.’
How to Delete Locations on the Shopify Store?
If you do not want to sell from a specific location or stock your products from there, delete the location. Here’s how to do that.
1. Desktop
Deactivate the location. (Follow the steps above)
- In the Shopify admin, navigate to ‘Settings.’ And choose ‘Locations.’

- Tap the location you wish to delete in the ‘Add Locations’ section.

- Tap ‘Delete Location.’
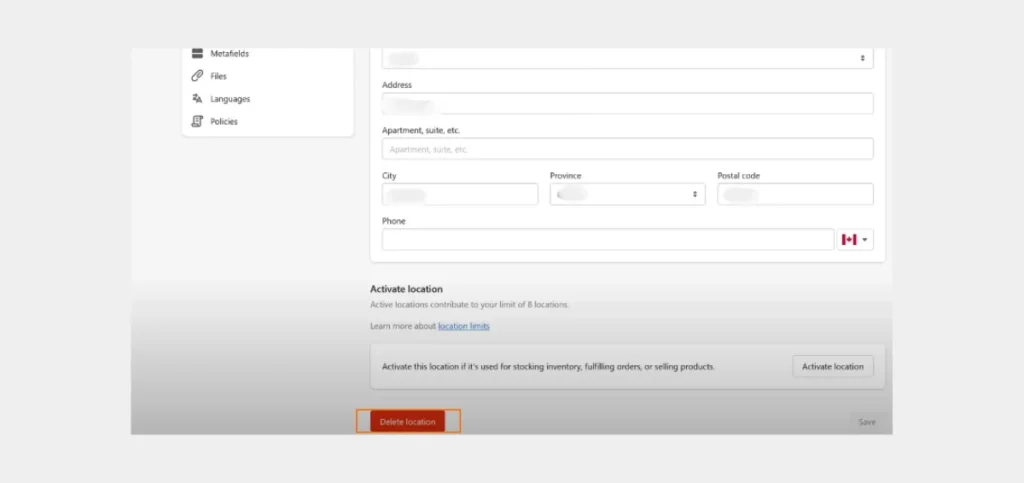
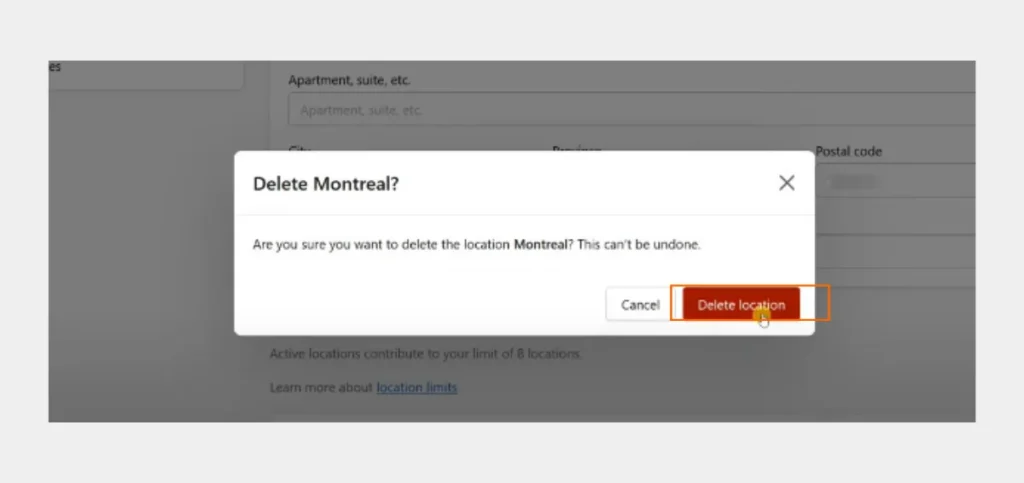
- Tap ‘Delete Location’ to confirm.
2. iPhone
- Open the Shopify app and hit the three horizontal dots button.
- Choose ‘Settings.’
- Tap ‘Locations’ in the ‘Store Settings.’
- Tap the location you wish to delete in the ‘All Locations’ section.
- Tap ‘Delete Location.’
- Tap ‘Delete Location’ to confirm.
3. Android
- Open the Shopify app and touch the three vertical lines button.
- Choose ‘Settings.’
- Tap ‘Locations’ in the ‘Store Settings.’
- Tap the location you wish to delete in the ‘All Locations’ section.
- Tap ‘Delete Location.’
- Tap ‘Delete Location’ to confirm.
Looking for more hands-on help with your Shopify store? Our Shopify support services are just a call away!
How to Create Shopify Shipping Profiles?
To enable shipping on your store, you have to create a shipping profile. If you are shipping based on different products, you must create separate profiles for separate product groups.
You have to create shipping profiles based on the product groups or manage your shipping price. You don’t have to create a shipping profile if you are using the regular Shopify shipping prices. Need a hand with setting up custom profiles according to your specific requirements? Partner with a Shopify expert. They’ll set up profiles, streamlining the entire shipping process.
Create a General Shipping Profile
Follow the steps below to set up your general shipping profile.
- As the Shopify admin, navigate to ‘Settings.’

- Choose ‘Shipping and Delivery.’
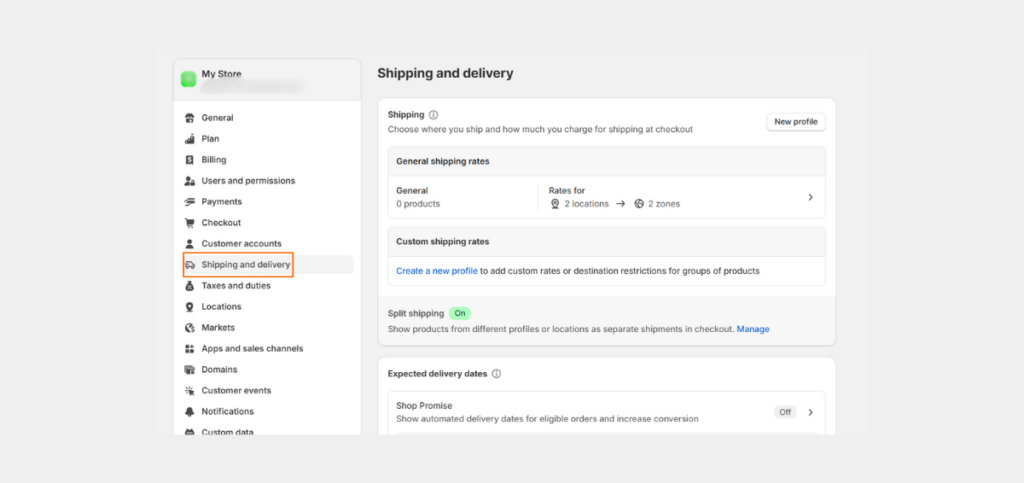
- Tap the shipping profile in the ‘General Shipping Rates’ section.
- Make changes to your location in the ‘Shipping Origins’ section.
- Follow these steps for every shipping zone that you will be including in your shipping profile.
- Tap ‘Create Zone’ in ‘Shipping Zones.’
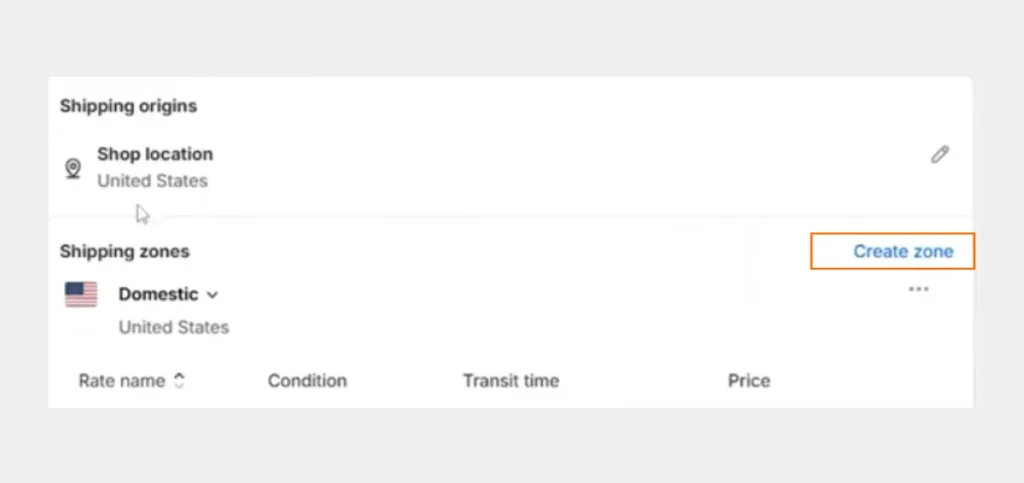
- Enter the shipping zone name.
- Choose the regions or places part of that zone and tap ‘Done.’
- Hit ‘Save.’
Set up a Custom Shipping Profile
Follow the instructions below to create a custom shipping profile on Shopify.
- As the Shopify admin, navigate to ‘Settings.’

- Choose ‘Shipping and Delivery.’

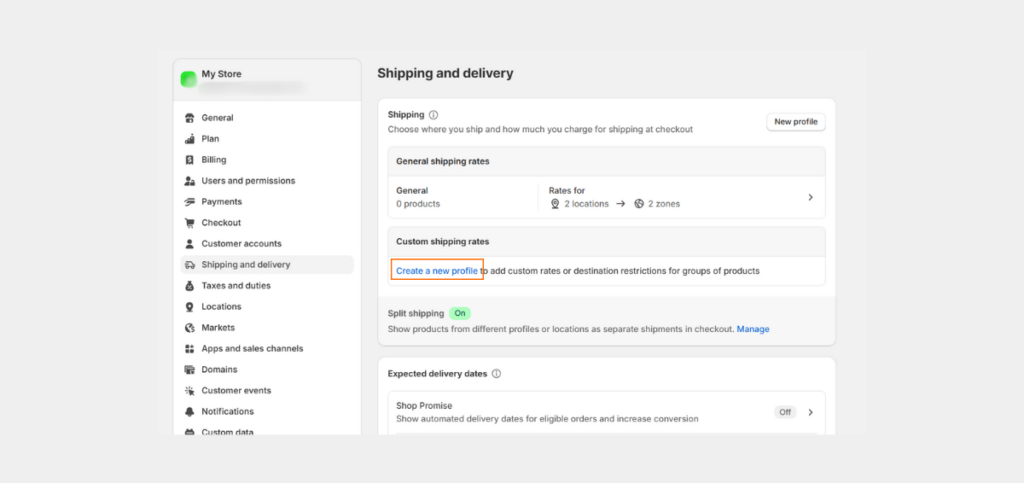
- Tap ‘Create New Profile’ in ‘Custom Shipping Rates.’
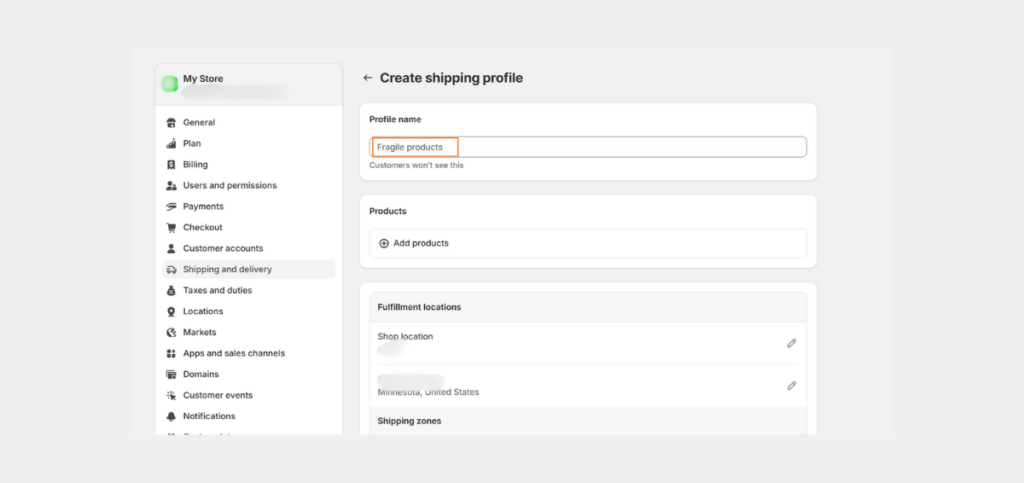
- Input a profile name.
- Tap ‘Add Products’ in the ‘Products’ section.
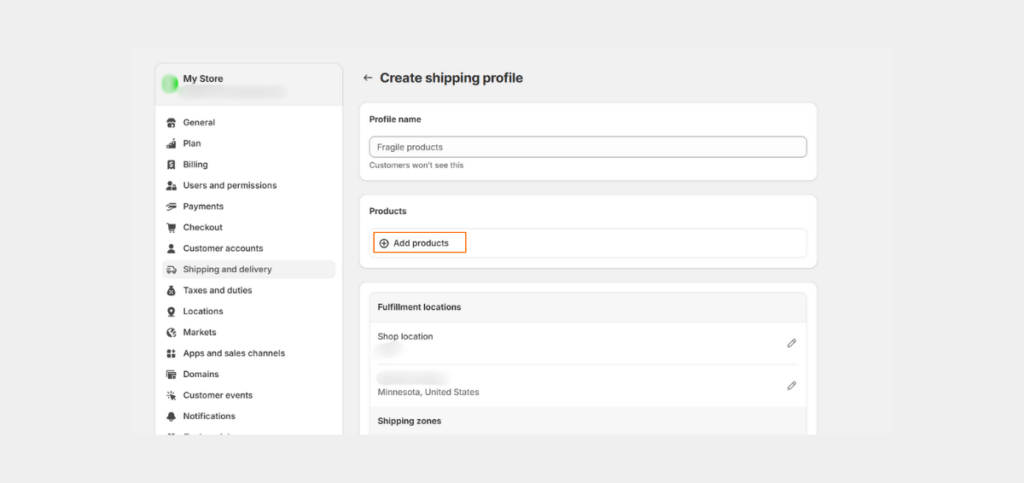
- Now, add products to your shipping profile.
- Make changes to your locations in the ‘Shipping Origins’ section.
- Follow these instructions for every shipping zone that you will be having in your shipping profile.
- Tap ‘Create Zone’ in ‘Shipping Zones.’

- Enter the shipping zone name.
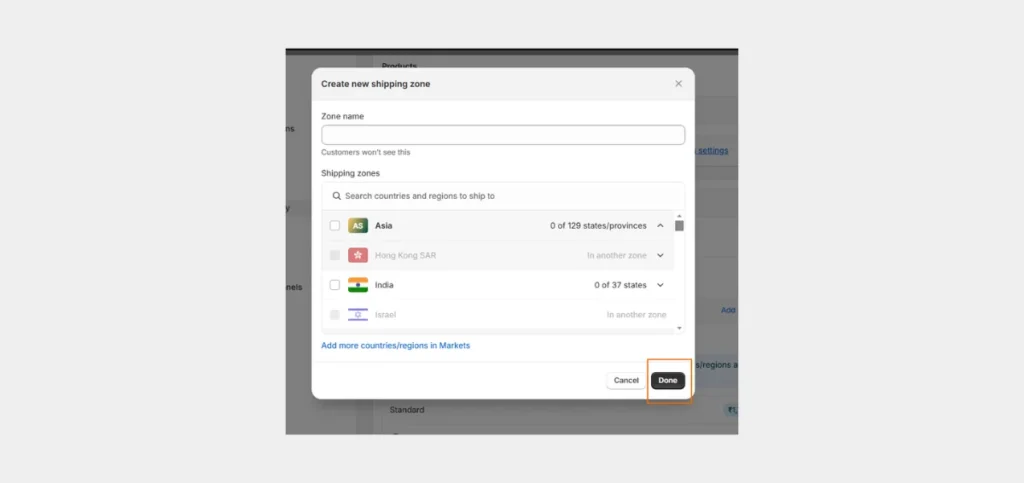
- Choose the regions or places part of that zone and tap ‘Done.’
- Tap ‘Add Rate’ for every shipping price you want in that zone. Select the details of the rate and tap ‘Done.’
- Tap ‘Save.’
How to Set up Shopify Shipping Zones?
A shipping zone in Shopify is a specific region based on provinces or countries. Every zone lets you create a distinct set of shipping prices. These are displayed to customers who use a shipping address belonging to that zone.
In the following sections, you will find how to add, edit, and delete a shipping zone.
Add a Shipping Zone
Follow the steps below to add a shipping zone.
- Access your Shopify admin panel.
- Visit ‘Settings’ followed by ‘Shipping and Delivery.’
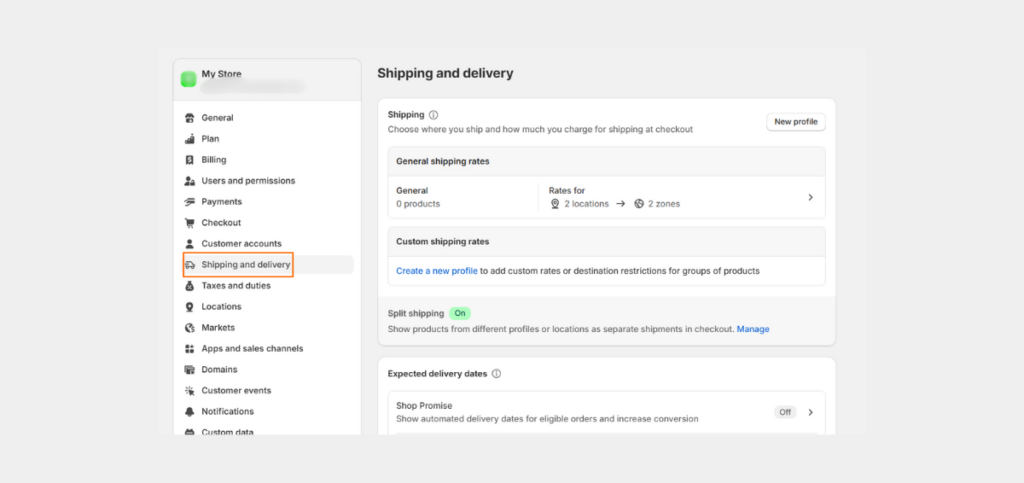
- Tap the shipping profile to where you wish to add shipping zones in the ‘Shipping’ section.
- Now, in the group of locations where you wish to add a shipping zone, tap ‘Create Zone.’
- Input a shipping zone name.
- Select the regions or countries that you’d like in that specific zone and click ‘Done.’
- Add any prices you’d like to add for the zone.
- Finally, tap ‘Save.’
Edit a Shipping Zone
A single country within a group of locations in your shipping profile can only remain in one shipping zone. If you want to add a country to another shipping zone, you must remove it from the shipping zone it is currently added to. Here are the steps.
- Access your Shopify admin panel.

- Visit ‘Settings’ followed by ‘Shipping and Delivery.’

- Tap the shipping profile you wish to edit in the ‘Shipping’ section.
- Tap the three horizontal dots button beside the zone that you wish to change.
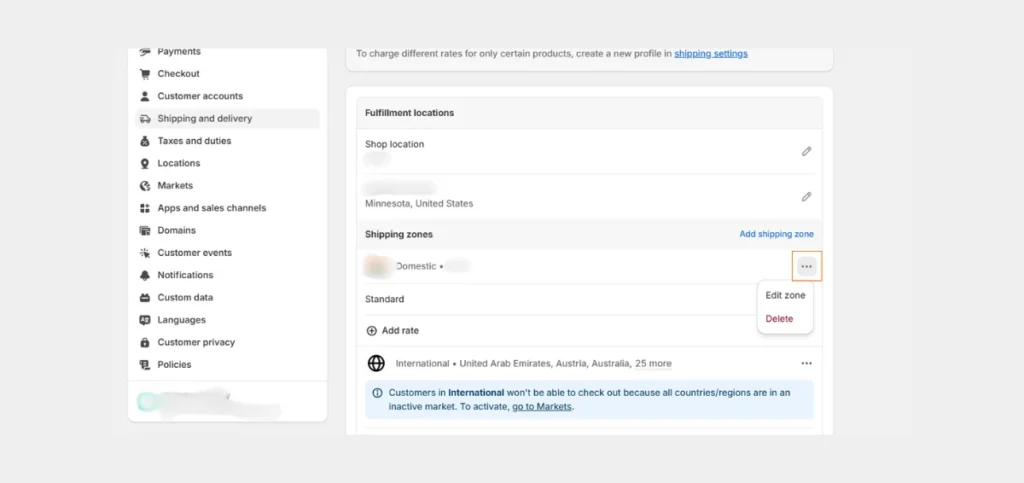
- Tap ‘Edit Zone’ in the dropdown menu.
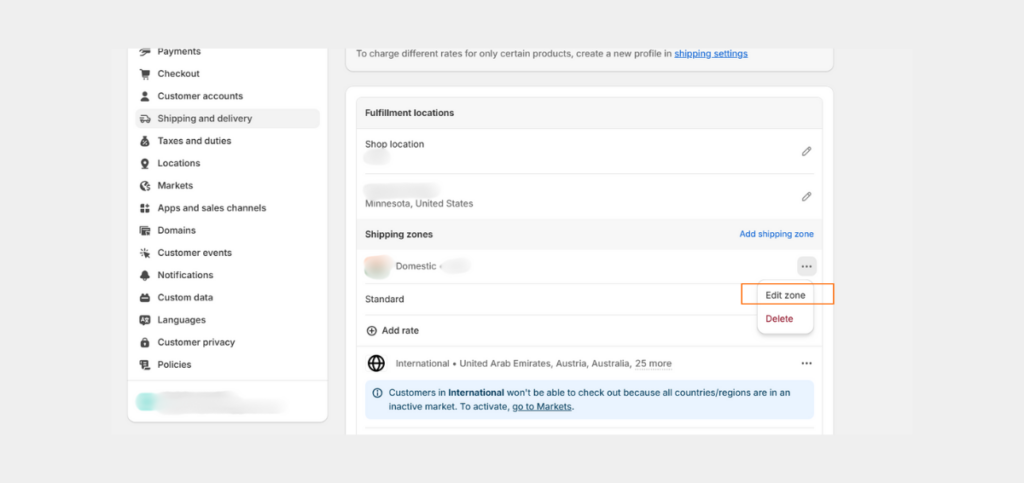
- Make the necessary changes and click ‘Done.’
- Finally, tap ‘Save.’
Delete Shipping Zone
Delete or remove a zone permanently through the steps below.
- Access your Shopify admin panel.

- Visit ‘Settings’ followed by ‘Shipping and Delivery.’

- Tap the shipping profile you wish to edit in the ‘Shipping’ section.
- Tap the three horizontal dots button beside the zone that you wish to delete.

- Tap ‘Delete’ in the dropdown menu.
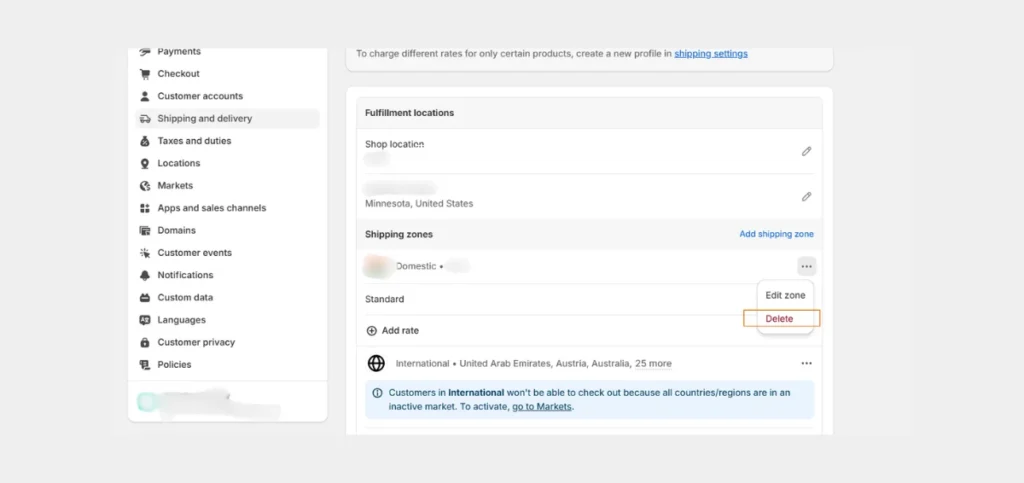
- Hit ‘Save.’
Also Read: Why You Should Set Up Enhanced Google Analytics for Your Shopify Store?
How to Create Shopify Shipping Rates?
You can create custom shipping rates on Shopify. This can be done after setting up your shipping profiles and shipping zones. You can set up four types of shipping rates. All of them are explained in the sections below.
Flat Shipping Rates
Flat shipping rates are particular shipping prices that customers are charged according to their orders. For example, you can charge a $10 flat shipping rate on every order placed. This means that when the customer checks out, they will be charged $10 as a flat shipping rate. This gives you greater control over the amount that your customers will be charged during checkout.
Flat shipping rates are of the following types:
- General rates: These provide a flat shipping cost irrespective of what the customer purchases. You can set up different flat rates for different types of shipping, such as regular shipping for $5 and fast or expedited shipping for $20. The rates will display as options in the checkout for an order.
- Price-based rates: Price-based rates let you set up maximum and minimum cart values for your flat shipping rates. For example, you wish to charge different rates for orders below $50 and those over this amount. Through price-based rates, you can set a flat shipping price of $10 USD for orders above $50 and $4 for those that are under this amount.
- Weight-based rates: Through weight-based rates, you set the maximum and minimum weights that qualify an order for your flat shipping prices. As an example, if you want to charge different rates for orders over and below 5 kg, you can set a flat shipping rate of $15 USD for orders above 5 kg and a flat shipping rate of $7 USD for those below 5 kg. However, if the order doesn’t match any defined shipping rate, in Shipping and Delivery, it is assigned to the next maximum available weight-based rate.
Free Shipping Rates
Free shipping rate is when the shipping price is $0 USD. You can change a flat shipping rate to free shipping by setting its shipping price to $0. Store owners wanting to offer free shipping can set up a general flat shipping rate with a $0 USD cost. On the other hand, if you want to offer free shipping only on orders above $100, set up a price-based flat rate of $0 USD for orders above $100.
Calculated Shipping Rates
Calculated shipping rates are shipping prices that a shipping app or carrier that you have added to your store provides. The app gets the customer’s cart information when they checkout. They provide the amount that should be charged for shipping. Calculated shipping rates offer you the benefit of sending the precise cost of shipping an order straight to your customer.
Calculated Shipping Prices from Shipping Carriers
You can specific shipping carriers to your shipping settings depending on your store’s location and subscription plan. Shipping carriers use any one of the factors below when calculating the shipping charge.
- Shipping Location
- Shipping origin
- Shipment’s weight
- Shipment’s value
- Measurements of the shipment box
- Dimensional weight
- Requested delivery speed
Calculated Shipping Prices from Shipping Apps
Apps also offer calculated shipping prices. It is in the case of your carrier using an app to integrate with Shopify. An app integration is also used when you need a shipping setup with more functionalities. Visit the Shopify App Store to find the available shipping apps.
Local Delivery Method Rates
Local delivery method rates are suitable for stores with customers who live nearby. If you offer delivery, you can set up a local delivery method which your customers can opt for during checkout. Set up a delivery fee and minimum amount of order.
Define the delivery availability by listing postal codes. Alternatively, you can select a radius around your location. Customers who are living within this radius or have a postal code that’s eligible for local delivery can choose the local delivery option at checkout as the shipping option.
Pick-up in-store is another option you can provide to your customers. Customers living near your location or your store’s pickup store can simply walk up to the store to pick up their orders. Customers who avail of this option won’t have to pay a shipping fee.
Final Thoughts
Setting up shipping rates correctly is crucial for both you and your customers. Follow the instructions in this post carefully as per your business’s unique needs. If setting up shipping rates can seem tedious or complex, reach out to Website Pandas. As a full-service Shopify expert agency, we will help you set up shipping rates based on your requirements. Our Shopify experts will ensure that everything is set up correctly, so that neither you nor your customers feel confused. Connect with us today to learn how we can help you.

